
21 Christmas Tree Crafts for 5-Year-Olds
The holidays are the perfect time to get creative with your little ones! These 21 Christmas tree crafts are designed specifically for 5-year-olds, with simple steps and plenty of room for imagination. Most use materials you already have at home, and each one is sure to bring festive fun to your family.

1. Paper Plate Christmas Tree
Step 1: Cut a paper plate in half and paint it green.
Step 2: Glue on pom-poms, sequins, or torn pieces of colored paper as ornaments.
Step 3: Add a star sticker on top and a brown paper rectangle for the trunk.
2. Handprint Christmas Tree Card
Step 1: Trace your child’s hand in green paint or paper 3-4 times, arranging the handprints in a tree shape on cardstock.
Step 2: Let them add “ornaments” with fingerprint dots in different colors.
Step 3: Draw or glue a brown trunk at the bottom and add a star on top.
3. Pasta Christmas Tree
Step 1: Glue different types of pasta (bow ties, shells, spirals) onto cardboard in a triangle shape.
Step 2: Paint the pasta tree green and let it dry completely.
Step 3: Add glitter glue for sparkle and a gold-painted pasta star on top.
4. Popsicle Stick Tree Ornament
Step 1: Glue three popsicle sticks together in a triangle shape.
Step 2: Paint the triangle green and let dry.
Step 3: Decorate with tiny pom-poms or beads, then attach string to hang.
5. Cotton Ball Snowy Tree
Step 1: Draw or cut out a simple tree shape on colored paper.
Step 2: Have your child glue cotton balls all over the tree to create a snow-covered look.
Step 3: Add a sprinkle of glitter and a paper star on top.
6. Egg Carton Christmas Tree
Step 1: Cut out individual egg carton cups and paint them green.
Step 2: Stack and glue them in decreasing sizes to form a 3D tree.
Step 3: Decorate with buttons, beads, or small craft jewels.
7. Torn Paper Mosaic Tree
Step 1: Draw a triangle tree outline on paper and give your child green construction paper to tear into small pieces.
Step 2: Glue the torn pieces inside the outline to fill the tree.
Step 3: Add a brown trunk and colorful “lights” with markers or dot stickers.
8. Sponge Stamp Tree
Step 1: Cut a kitchen sponge into a simple tree shape.
Step 2: Let your child dip it in green paint and stamp it onto paper several times.
Step 3: Once dry, add decorations with markers, stickers, or glitter glue.
9. Cupcake Liner Tree
Step 1: Flatten green cupcake liners and cut them in half.
Step 2: Glue them in layers on paper, starting with a large liner at the bottom and getting smaller toward the top.
Step 3: Add a yellow paper star and small sticker ornaments.\

10. Fork-Painted Tree
Step 1: Dip a plastic fork in green paint.
Step 2: Press the fork onto paper in a triangle shape, layering to create a textured tree.
Step 3: Add a brown trunk and let your child decorate with fingerprint ornaments.
11. Tissue Paper Scrunched Tree
Step 1: Cut or draw a tree outline on cardboard.
Step 2: Have your child scrunch small pieces of green tissue paper and glue them onto the tree.
Step 3: Add colorful tissue paper balls as ornaments and a gold star.
12. Button Christmas Tree
Step 1: Draw a triangle tree shape on canvas or heavy paper.
Step 2: Let your child glue green buttons of various sizes all over the tree.
Step 3: Add a few colorful buttons as ornaments and a star button on top.
13. Pipe Cleaner Tree
Step 1: Twist green pipe cleaners together to form a triangle tree shape.
Step 2: Wrap the pipe cleaners around a pencil first to make them curly and fun.
Step 3: Thread beads onto the branches and add a star-shaped pipe cleaner on top.
14. Straw-Blown Paint Tree
Step 1: Drop green paint onto paper and have your child blow through a straw to spread it into branch shapes.
Step 2: Keep blowing to create a tree-like form.
Step 3: Once dry, add dots of paint or stickers as ornaments.
15. Yarn-Wrapped Tree
Step 1: Cut a cardboard triangle and wrap green yarn around it (tape the end to get started).
Step 2: Let your child continue wrapping the yarn all over the tree.
Step 3: Glue on small pom-poms, beads, or buttons as decorations.
16. Bubble Wrap Tree Print
Step 1: Cut bubble wrap into a triangle shape and tape it to a small block of wood or thick cardboard.
Step 2: Paint the bubble wrap green and press it onto paper to create a textured tree.
Step 3: Add ornaments and a star with markers or stickers.
17. Coffee Filter Tree
Step 1: Flatten coffee filters and let your child paint them with green watercolors.
Step 2: Once dry, fold them in half and glue them in layers to create a fluffy tree.
Step 3: Sprinkle with glitter and add a paper star on top.
18. Fingerprint Lights Tree
Step 1: Draw or paint a simple green triangle tree on paper.
Step 2: Have your child press their finger in different colored paints to make “string lights” all over the tree.
Step 3: Add a star sticker or drawing at the top.

19. Paper Chain Tree
Step 1: Help your child make small paper chains from green construction paper strips.
Step 2: Glue the chains in horizontal rows on paper, starting wide at the bottom and getting smaller toward the top.
Step 3: Add a yellow star and colorful paper circles as ornaments.
20. Felt Sticker Tree
Step 1: Cut a large triangle from green felt and glue it to cardboard or paper.
Step 2: Give your child foam stickers, felt shapes, or fabric scraps to press onto the tree.
Step 3: Add ribbon pieces, sequins, or a felt star to complete.
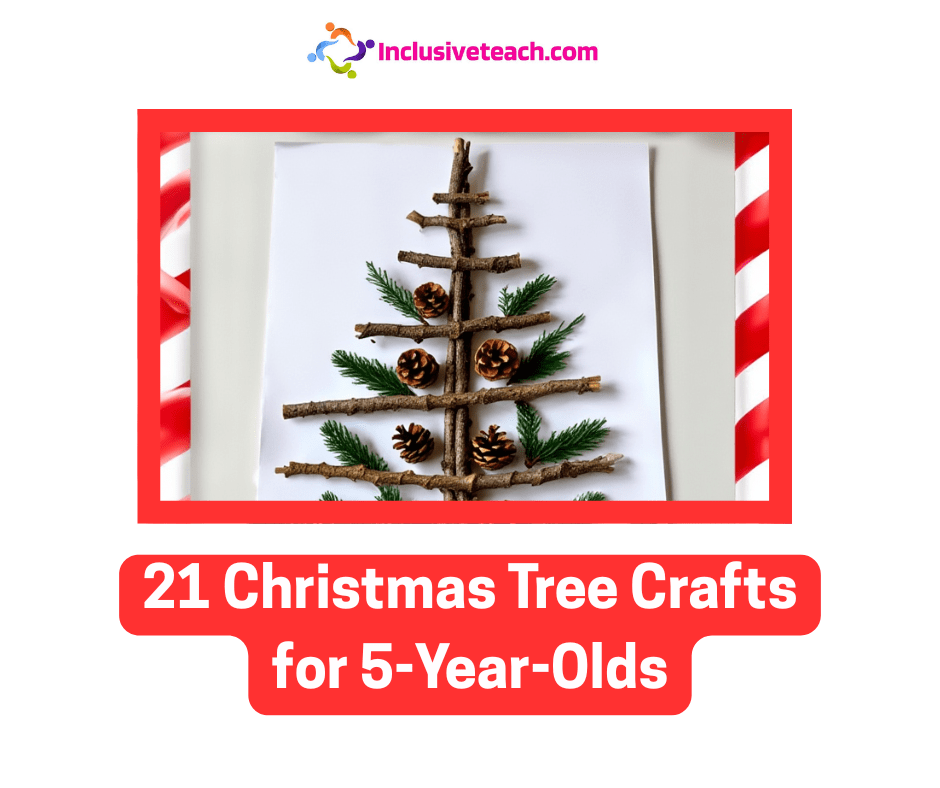
21. Nature Walk Tree
Step 1: Draw a tree outline on paper and go on a nature walk to collect small twigs, pinecone pieces, and evergreen clippings.
Step 2: Help your child glue the natural materials onto the tree outline.
Step 3: Spray paint lightly with green or silver (adult only) or leave natural, then add a construction paper star.

Materials Table
| Material | Used In Crafts |
|---|---|
| Paper plates | #1 |
| Green paint | #1, #3, #4, #8, #10, #16 |
| Pom-poms | #1, #4, #15, #20 |
| Sequins | #1, #20 |
| Construction paper (various colors) | #2, #7, #19, #21 |
| Cardstock | #2 |
| Pasta (various shapes) | #3 |
| Cardboard | #3, #13, #15, #20 |
| Glitter glue | #3, #5, #8 |
| Popsicle sticks | #4 |
| String/ribbon | #4, #20 |
| Cotton balls | #5 |
| Glitter | #5, #11, #17 |
| Egg cartons | #6 |
| Buttons | #6, #12, #15 |
| Beads | #6, #13, #15 |
| Dot stickers | #7, #8, #10, #18 |
| Markers/crayons | #7, #8, #16, #18 |
| Kitchen sponge | #8 |
| Cupcake liners (green) | #9 |
| Plastic fork | #10 |
| Tissue paper | #11 |
| Canvas or heavy paper | #12 |
| Pipe cleaners | #13 |
| Straw | #14 |
| Yarn | #15 |
| Bubble wrap | #16 |
| Coffee filters | #17 |
| Watercolors | #17 |
| Felt | #20 |
| Foam stickers | #20 |
| Natural materials (twigs, pinecones, evergreen) | #21 |
| Glue/glue sticks | All crafts |
| Scissors (adult supervision) | Most crafts |
Happy crafting, and enjoy making wonderful holiday memories with your little ones! 🎄

Related
Discover more from Special Education and Inclusive Learning
Subscribe to get the latest posts sent to your email.
Source link
You may also like

Understanding the Concrete-Pictorial-Abstract (CPA) Approach

Words That Sound the Same: A Visual Homophone Guide
