
Introduction to Docker – Dataquest
Have you ever heard someone say, “Well, it worked on my machine”?
It’s one of the most common problems in software and data workflows: something works fine in your local environment, but completely breaks when someone else tries to run it.
Docker helps solve that. It lets you create isolated environments called containers that bundle together everything your code or tools need to run: the operating system, dependencies, configuration, and more.
Instead of asking a teammate to install the “right” version of PostgreSQL or configure Python packages, you can share a single containerized setup that just works, no matter what machine they’re on.
In this tutorial, you’ll get hands-on with Docker. By the end, you’ll be able to:
- Install Docker Desktop
- Run a PostgreSQL database inside a container
- Connect to it using built-in tools
- Persist data across restarts
- Manage containers using both the CLI and Docker Desktop
All without permanently installing PostgreSQL on your machine.
To exemplify the value of Docker, we’ll explore a common data engineering scenario:
You’re developing a small ETL pipeline for a grocery chain that will eventually run in production, where it connects to a PostgreSQL database and processes product data. But your local machine doesn’t have Postgres installed, and even if it did, it might not match the version used in production.
Rather than configuring Postgres manually, you’ll use Docker to spin up a local container that mirrors the production environment. This gives you a clean, isolated setup to develop and test your pipeline, without modifying your system.
We’ll use a sample dataset and create a database called products to simulate the pipeline’s target environment.
Let’s get started!
What is Docker?
As we begin, let’s clarify what Docker is and why it’s useful.
Docker is a platform that lets you run containers, which are lightweight, portable environments that isolate your code and tools from the rest of your system.
You can think of a container like a self-contained box. It includes an operating system, libraries, configuration, and the software you want to run. Because everything is bundled together, containers run the same way on any machine with Docker installed.
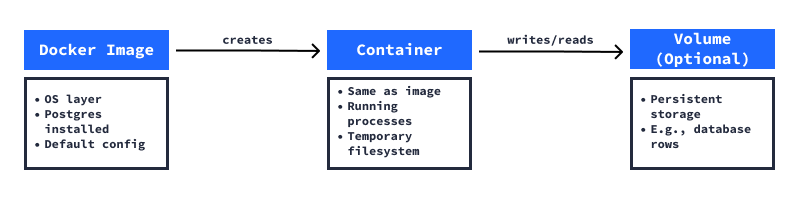
These containers are created from Docker images. A Docker image is like a blueprint. It defines what goes inside a container, including the OS version, installed tools, and configuration. When you run an image, Docker creates the container**, which is the live, running version of that environment.
If you need to store data, say, rows in a Postgres database, you can create a volume. That keeps your data safe even if the container is stopped or removed. And if you want to connect to a service running inside the container (like a database), you’ll use port mapping to make it accessible from your host machine.
We’ll use all of these concepts in this tutorial. We’ll start by pulling a Postgres image from Docker Hub, run it as a container, connect to it using port mapping, insert and query data, and use a volume to keep that data safe across restarts.
Compared to virtual machines, containers are more lightweight and efficient. They share the host’s operating system, which makes them faster to start and easier to manage.
Docker is especially helpful when you:
- Need to run tools like PostgreSQL, Spark, or Airflow locally
- Want consistent environments across dev, staging, and production
- Are sharing reproducible workflows with teammates
- Deploy pipelines to the cloud
Now, let’s install Docker and try it out.
Installing Docker Desktop
![]()
![]()
To follow along with this tutorial, you’ll need to have Docker installed on your machine. Docker provides an all-in-one app called Docker Desktop, which works on Windows, macOS, and most Linux distributions.
If you don’t already have it, here’s how to get set up:
- Download the installer for your operating system.
- Follow the installation instructions for your platform. On Windows, you may be asked to enable WSL 2 or Hyper-V. On macOS, you’ll need to grant permissions during the install. On Linux, you might need to add your user to the
dockergroup to run Docker withoutsudo, and optionally configure Docker to start automatically with systemd. - Once installation is complete, launch Docker Desktop.
Note: Docker Desktop may prompt you to sign in with a Docker Hub account. You can skip this step; it’s optional and not required for anything in this tutorial.
You’ll know it’s running when you see the Docker whale icon in your system tray or menu bar.
To confirm everything’s working, open a terminal and run:
docker --versionYou should see a version number, like:
Docker version 28.0.2, build abc123Then try:
docker psThis command lists any running containers. If you haven’t started one yet, you’ll just see the column headers — that’s expected.
Optional: If you’re curious, take a minute to open Docker Desktop and explore the interface. You’ll be able to visually inspect running containers, check logs, and manage volumes — all of which you’ll use later in this tutorial.
Pull and run a PostgreSQL container
With Docker installed, you’re ready to run your first real service: a PostgreSQL database.
We’ll start by using an official image from Docker Hub, a public repository of prebuilt images.
Step 1: Pull the image
In your terminal, run:
docker pull postgres:15This downloads version 15 of the official PostgreSQL image to your machine. You only need to do this once because Docker will reuse the image unless you update or delete it.
Step 2: Run a container
Next, let’s launch the container:
docker run --name local_pg \
  -e POSTGRES_USER=postgres \
  -e POSTGRES_PASSWORD=postgres \
  -e POSTGRES_DB=products \
  -p 5432:5432 \
  -d postgres:15
To break that command down:
--name local_pg: gives the container a name.-e ...: sets environment variables used by Postgres (like username, password, and database name).-p 5432:5432: maps port 5432 inside the container to your local machine (you’ll use this to connect later).-d: runs the container in the background (detached).postgres:15: tells Docker which image to use.
Once it’s running, check it with:
docker psYou should see local_pg listed in the output. That means your PostgreSQL server is up and running in a container.
Thanks to the -p 5432:5432 option we included earlier, the Postgres server running inside the container is now accessible from your host machine at localhost:5432. This port mapping connects the internal port used by Postgres (inside the container) to the same port on your system, so tools like psql or database GUIs can talk to it as if it were running natively.
Connect to the running database
Now that your PostgreSQL container is running, let’s connect to it and try a simple query.
The easiest way is to use a built-in tool: psql, the interactive Postgres terminal. It’s already installed inside the container.
To open a shell inside the container, run:
docker exec -it local_pg bashIn this command:
exec: runs a command in an existing container.it: makes the session interactive, so you can type commands and see the output, just like you would in a normal terminal window.local_pg: the name of the container.bash: starts a Bash shell inside it.
Once you’re inside the container, connect to Postgres using:
psql -U postgres -d productsThis tells psql to:
U postgres: connect as thepostgresuser.d products: connect to theproductsdatabase.
You should now see a products=# prompt. That means you’re connected and ready to run SQL.
Let’s try a few commands:
CREATE TABLE test_table (id serial PRIMARY KEY, name text);
INSERT INTO test_table (name) VALUES ('Alice'), ('Bob');
SELECT * FROM test_table;
This creates a simple table, adds two rows, and displays the results. You should see:
 id | name
----+-------
  1 | Alice
  2 | Bob
To exit the psql interface, type:
\qTo exit the Bash shell and return to your normal terminal, type:
exitYou’ve just connected to a containerized database, created a table, inserted data, and ran a query — all without installing PostgreSQL on your system.
Next, we’ll load a real dataset.
Load a sample dataset
So far, you’ve manually added a few rows to a table. Let’s load something a little more realistic: a product CSV file.
We’ll use the USDA’s 2022 vegetable prices dataset, which includes average retail prices for fresh vegetables across U.S. cities. You can download the CSV from here [source].
Make sure the file is saved somewhere accessible on your host machine, ideally in the same folder as your project. For this example, we’ll assume the file is named vegetables.csv.
Here’s how to load it:
Step 1: Copy the file into the container
In your terminal:
docker cp vegetables.csv local_pg:/vegetables.csvThis command copies the CSV file from your local system into the running container.
Step 2: Connect to the database
docker exec -it local_pg bashThen:
psql -U postgres -d productsStep 3: Create a table
Before we can import the CSV, we need a table for the data to go into.
Unlike tools like pandas, PostgreSQL doesn’t infer the table structure from the file. We have to define the table ourselves first, specifying the column names and data types that match the structure of the CSV.
Based on the actual CSV content, here’s the schema we’ll use:
CREATE TABLE vegetables (
  vegetable text,
  form text,
  retail_price numeric,
  retail_price_unit text,
  yield numeric,
  cup_equivalent_size numeric,
  cup_equivalent_unit text,
  cup_equivalent_price numeric
);
Step 4: Import the data
Now you’re ready to load the CSV into your new table. We’ll use the COPY command, which is built into Postgres and optimized for loading large files.
Run this command inside psql:
COPY vegetables
FROM '/vegetables.csv'
DELIMITER ','
CSV HEADER;
Here’s what each part does:
COPY vegetables: Tells Postgres to load data into thevegetablestable.FROM '/vegetables.csv': Specifies the full path to the CSV file inside the container. This is the path we used when we randocker cp.DELIMITER ',': Says that commas separate the columns.CSV HEADER: Tells Postgres to skip the first row, since it contains column names, not data.
If everything goes smoothly, Postgres will confirm how many rows were inserted. If there’s a typo in the path or a mismatch in the columns, it will give you an error. Double-check that the file exists at /vegetables.csv and that your table schema matches the CSV.
Step 5: Preview the data
SELECT * FROM vegetables LIMIT 5;If everything worked, you’ll see a few rows from the dataset.
You’ve now loaded real data into your containerized database: a powerful technique for quickly exploring or testing new data sources.
Persist data with Docker volumes
Right now, the data you’ve loaded into Postgres is stored inside the container. That’s fine for quick experiments, but what happens if the container is deleted or rebuilt?
Try it out:
docker stop local_pg
docker rm local_pg
This stops and removes the container. Now run:
docker ps -aThe container is gone, and so is your data! When you launch a new container from the same image, it’ll start from scratch.
To fix this, Docker provides volumes: a way to store data outside the container’s internal filesystem. Volumes are managed by Docker, and they persist even when containers are stopped or removed.
Now let’s create a volume for our vegetable.csv data.
Step 1: Create and run a new container with a volume
docker run --name local_pg \
  -e POSTGRES_USER=postgres \
  -e POSTGRES_PASSWORD=postgres \
  -e POSTGRES_DB=products \
  -p 5432:5432 \
  -v pgdata:/var/lib/postgresql/data \
  -d postgres:15
This is nearly the same command as before, with one new part:
v pgdata:/var/lib/postgresql/data: This tells Docker to mount a named volume (pgdata) at the path where Postgres stores its data. The volume lives outside the container, so your database files will survive restarts and removal.
Step 2: Confirm that the volume exists
docker volume lsYou should see pgdata listed. You can also inspect it:
docker volume inspect pgdataThis shows where the volume is stored on your system, along with metadata.
Step 3: Reload the data
Since this is a fresh container, the database is empty again. You can repeat the steps from before:
- Copy
vegetables.csvinto the container - Recreate the
vegetablestable - Load the data with
COPY
This time, once you’ve confirmed the data is loaded, stop and remove the container again:
docker stop local_pg
docker rm local_pg
Now restart it with the same command you used in Step 1 (reusing the pgdata volume), reconnect, and run:
SELECT COUNT(*) FROM vegetables;Your data is still there.
Volumes are useful in any real-world Docker workflow because they keep your data safe, isolated, and portable, all without polluting your local filesystem.
Manage containers from the CLI and Docker Desktop
You’ve been using docker run and docker stop already. Now let’s expand your toolbox a bit. As you work with more containers, it becomes important to know how to inspect, clean up, and monitor what’s running.
See what’s running
To list running containers:
docker psTo list all containers (including stopped ones):
docker ps -aEach row shows the container ID, name, status, and the command used to start it.
Inspect logs
To view logs from a container’s standard output and error streams:
docker logs local_pgThis shows everything the container’s main process has output so far, which is useful for debugging or verifying that services are running as expected.
To follow logs in real time (like tail -f):
docker logs -f local_pgThis is especially helpful when your container runs in the background (-d) and you want to monitor what it’s doing.
Note:
docker logsis similar to how Kubernetes handles container output withkubectl logs.
Exec vs. Attach: Two ways to connect
When working with running containers, there are two important ways to interact:
docker exec
Earlier in this tutorial, you used docker exec to open a terminal session inside your running container:
docker exec -it local_pg bashThis command started a new process inside the container (in this case, a Bash shell) so you could connect to the Postgres database and run SQL commands. You can use docker exec the same way to inspect files, restart services, or run any command inside a running container.
It’s like opening a fresh terminal window inside the container’s environment, separate from the main process.
docker attach
In comparison to docker exec, docker attach is used to connect directly to the container’s main process, which is the one that started when the container launched:
docker attach local_pgYou’ll see the output from that process, and you can interact with it if it accepts input. Unlike exec, attach doesn’t start anything new, it simply hooks into what’s already running.
If the container was launched in the background (with -d), docker attach is one way to watch it in real time. But be careful: pressing Ctrl+C while attached will send a termination signal to the main process, which stops the container. To detach safely without stopping anything, press Ctrl+P followed by Ctrl+Q.
This behavior demonstrates an important part of how containers work: each container wraps a single main process. When that process exits because of an error, a signal, or a normal shutdown, the container stops.
For example, if you change a config file and restart a service from within the container, but that service isn’t the container’s main process, your changes might not apply as expected, because Docker only tracks the main process.
To sum up the ways we’ve seen to interact with running containers:
docker exec: Run a new command or open a shell inside the containerdocker logs: View output from the main container process (similar tokubectl logs)docker attach: Connect to the main process to view output or interact with it in real time
Understanding these tools gives you a clearer picture of how containers behave and how to debug or manage them effectively.
Remove unused containers
If you’re done with a container:
docker stop local_pg
docker rm local_pg
This stops and deletes it, but, thanks to volumes, your data remains if you’re using one.
To delete everything, including volumes and images (be careful!):
docker system pruneIt’s a good idea to run this only when you’re sure you don’t need anything left behind.
View and manage with Docker Desktop
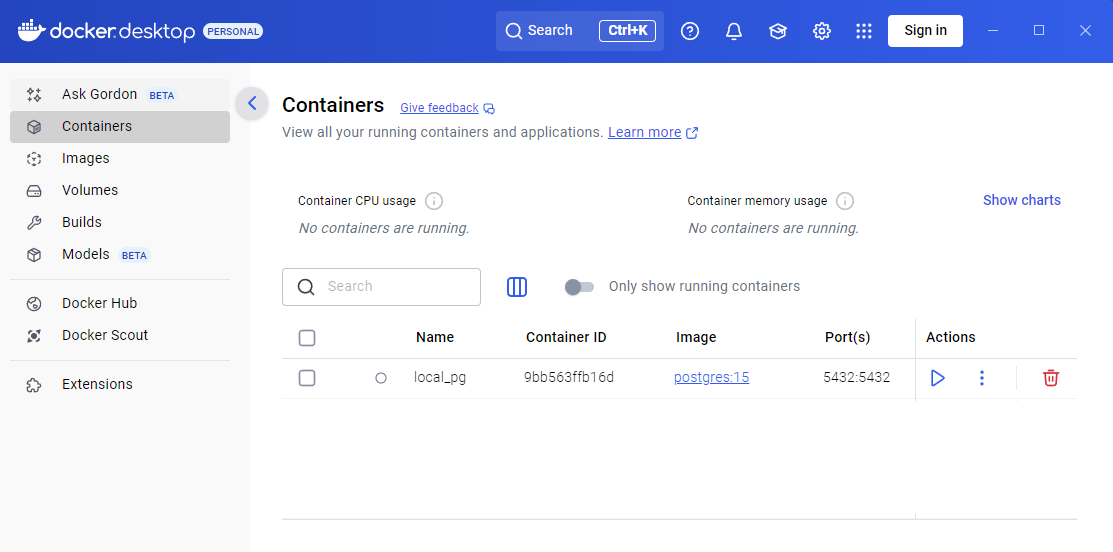
Docker Desktop makes this easier with a visual interface. Open it, and you can:
- View running containers
- Start/stop containers with one click
- See logs in real time
- Browse volumes and their contents
It’s a great way to check that things are working (and a good fallback if you forget a command!).
Wrap-up
You’ve now gone end-to-end with Docker in a real data engineering workflow:
- Installed Docker Desktop and verified that it’s running
- Pulled and started a PostgreSQL container from Docker Hub
- Connected to the database using built-in tools
- Created tables, inserted rows, and ran SQL queries
- Loaded a real dataset
- Used Docker volumes to persist your data
- Managed your containers using both the CLI and Docker Desktop
This setup mirrors real-world tasks that data engineers do all the time: spinning up temporary databases, testing data pipelines, and working with isolated environments that are portable and reproducible.
Now that you’ve seen Docker in action, you can begin applying it to your own projects, whether you’re testing ETL scripts, exploring new tools, or collaborating with teammates across different systems.
Nice work!
Source link

You may also like

eBook: Maximize eLearning Design On Any LMS For Associations

Why Your Current Harassment Prevention Training Isn’t Working
